Before proceeding with image export, do the image setup as described further.
Select Image ![]() Image File Options in the main menu to access the "Image File Options" window.
Image File Options in the main menu to access the "Image File Options" window.
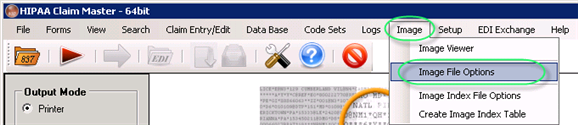
The "Image File Options" menu
The following window will appear:
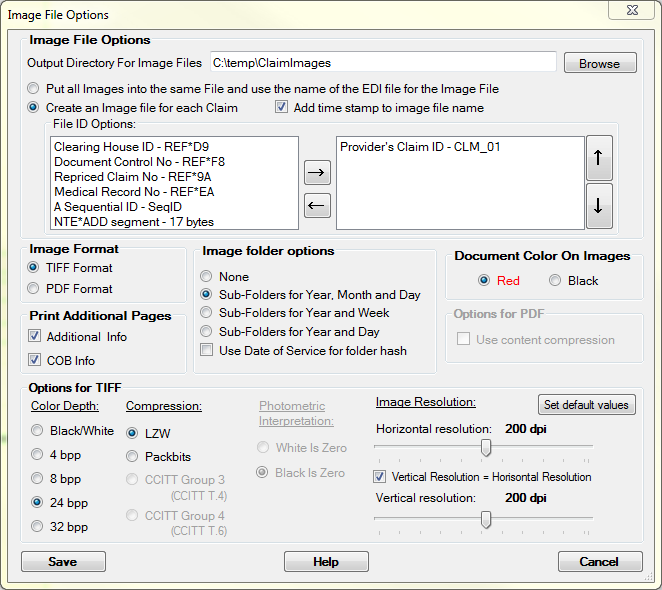
The "Image File Options" window
You can set the parameters for image file creation; they are described below.
Once the options have been set, click "Save."
Image File Options
| • | Output Directory for Image Files — Here you can set the path to the folder where the image files will be saved to. |
| • | Put All Images into the Same File and Use the Name of the EDI File for the Image File — This option allows to create a multi-page file with all the claim images in it using the EDI filename with a .tiff or .pdf extension. |
| • | Create an Image File for Each Claim — This option creates a separate image file for each individual claim. You can specify how the filename will be generated (what information will be included to the filename): |
| • | Provider's Claim ID — The Provider's Claim ID from the CML_01 segment. |
| • | Clearing House ID — The Clearinghouse ID from the REF*D9 value. |
| • | Document Control No — The Medical Record Number (REF*F8). |
| • | Repriced Claim No — The Repricer's Claim ID (REF*9A). |
| • | Medical Record No — For example, REF*EA. |
| • | A Sequental ID — A sequential number starting at one (SeqID). |
| • | NTE*ADD Segment — 17 bytes. |
You can create a hierarchy that determines which ID will be used for the filename. In the picture below, you see that the document control number (REF*F8) is the preferred filename. If such a segment is not present then the second option is the Clearing house ID, third is the Medical record number. Since none of these segments are mandatory, you might encounter claims that do not produce an image name. We strongly recommend to also use the Provider's Claim ID (CLM_01) as a fall back option in the naming of the image files.Your choice will then be stored in the Windows registry.
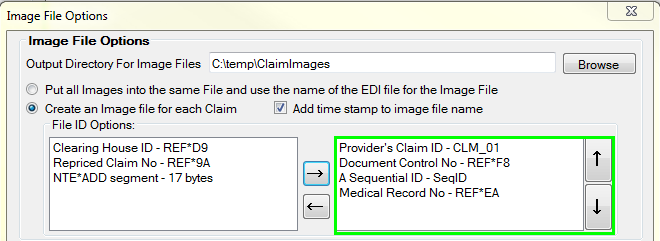
The image naming hierarchy
To prevent the overwriting of existing image files, the HIPAA Claim Master checks if a file with that name already exists and starts to append enumerations to the filename. For example, WD34222_3.pdf would be the 4th instance of a file with WD34222 as the Claim ID.
Image Format
Choose either PDF or TIFF. These are the two most widely used image formats. TIFF (Tagged Image File Format), historically derived from Telefax technology, has not been updated since 1992. PDF (Portable Document Format) has been the open standard since 2008 and has become very popular, due to the ease of the format.
Print Additional Pages
This option determines whether the additional pages with either COB information or segments with additional information that have no representation on the standard forms, should be printed on either paper or image files. This option helps you save paper. If you only need the main claim form, there is no need to create a multi-page image file with 2 extra pages.
Image Folder Options
When you create image files of claims, you could soon end up with thousands of images in one folder. Windows has real problems with folders containing more than 1,000 files. For this reason, the HIPAA Claim Master can hash the images over many folders to make sure that file quantities per folder remain low.
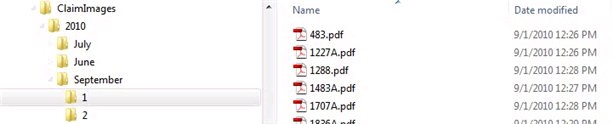
Folder Options Year, Month and Day
You can see that there is a folder with the year 2010 under the Output directory, then subdirectories with the Month which are, finally, further subdivided into days of the moth. The 2010/September/1 folder contains all the images created that day.
Document Color on Images
This section of the setup window is concerned with the output colors. The form background can be set to red to make the form more visually appealing and to allow the use of a color filter for OCR software.
Options for PDF
| • | Use Content Compression — Checking this option does result in considerably smaller files. You can choose the option to compress the content, thereby reducing the file size by roughly 50%. |
Options for TIFF
Here you can adjust the settings of the Image files.
| • | Color Depth — You can change color depth of the image (black / white, 4 bpp / 8bpp / 24bpp / 32bpp). |
Note: TIFF in Window's GDI library does not work with 16 bpp (bits per pixel). Color depths set lower then 16 bpp results in some losses in image quality.
Reference: The black-and-white (bi-level) image means that for each pixel (picture element) in the image we do not need three bytes as in the true color image (over 16.7 million colours), but only one bit that is 1/24 part of the pixel size from the true colour image. The one-bit pixel can express only black or white colors, nothing more.
| • | Compression — You can use compression with TIFF files: LZW and Packbits are used for all Colors, CCITT4 for black-and-white. |
| • | LZW — You can compress any type of TIFF image of any bit depth using LZW, a lossless method. The application can store the compressed image in a TIFF 5.0 file or keep it in memory. An average 2:1 compression ratio is achieved with LZW compression on images. |
| • | Packbits — You can compress and decompress gray scale, palette, and bitonal images using Packbits, a lossless method. Packbits are fast, widely-supported, and provide good compression of sparse images, such as scanned documents. The application can store the compressed image in a TIFF 5.0 file or keep it in memory. |
| • | Photometric Interpretation — For the black-and-white and grayscale images (when "Black/White" or "4 bpp" options are selected as color depth), you can specify the intended interpretation of the image pixel data. Select one of the following options: |
| • | White is Zero — The minimum sample value is displayed as white. |
| • | Black is Zero — Default value. The minimum sample value is displayed as black. |
| • | Image Resolution — You can change horizontal and vertical resolution of images from 96 to 300 dpi (dots per inch). Default resolution is 200 dpi. The same rule applies here: the larger the Resolution, the more computing time and power is consumed and the larger the image file sizes. |
Note: Theoretically we could use even higher resolutions, but it will slow down processing significantly result in approximately the same result in quality.